Cash Flow Analysis in maestro*
OBJECTIVE
An important aspect of a company’s financial management is monitoring the cash flow. Although the specific task is performed in a number of companies, the preferred methods may vary depending on the situation. With its extensive configuration possibilities, the Cash Flow Analysis option, presented through tabs and tables, can meet every customer’s needs.
The Cash Flow Analysis process can be broken down into three segments which are explained in this document:
- Preparing the required
maestro* settings.
This section involves entering key information in maestro* to provide accurate data; these elements are most often already or easily available.
- Configuring the analysis.
This portion includes customizing the lines’ rules and calculation methods, identifying the periods and how the numbers are displayed in the table, as well as defining types of manual adjustments.
- Monitoring the analysis.
This final part covers the actual cash flow analysis and how to make manual adjustments if needed.
| This how to is intended to be used in conjunction with the Cash Flow Analysis module’s Help documents: |
PREREQUISITEs
- General Settings (General Ledger > General > Cash Flow Analysis)
- Chart of Accounts
- Bank Accounts
- Annual Budgets
The following modules must also be installed:
- Accounts Receivable
- Accounts Payable
- Payroll (Labour)
Summary
The first two of the three Cash Flow Analysis segments pertain to parameters that must be specified before launching the analysis itself. The third segment describes the options involved in its operation.
Steps
1. Preparing the Required maestro* Settings
a) General Ledger Configuration
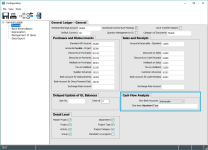
The first step consists in establishing how the bank accounts will be viewed in the Cash Flow Analysis, whether it will be individually or in groups. Users can also decide on a default one-time adjustment type.
maestro* > Accounting > Maintenance > Accounting > Configuration
This section can also be accessed through the General Settings:
maestro* > General Settings > General Ledger > General
- Click the General link from the menu on the left.
- Complete the Cash Flow Analysis section of the General Ledger – General tab.
The default accounts entered in the Purchases and Disbursements and Sales and Receipts sections will be used in the analysis for receipts and disbursements.
Field
Description
View Bank Accounts
Mode in which the accounts will be viewed.
One-Time Adjustment Type
Default type for one-time adjustments.
Note: This element can only be selected after the manual adjustment types have been defined in the option bearing the same name. The procedure is detailed in the Define Manual Adjustment Types Help document
b) Chart of Accounts
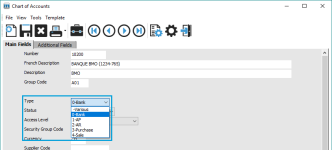
To ensure a bank account is displayed in the Cash Flow Analysis, it must be identified as such in the chart of accounts.
maestro* > Accounting > Maintenance > Accounting > Chart of Accounts
- Complete the Main Fields as needed.
Field
Description
Type
Type of the account; indicates in which situation the account should be displayed or available for selection.
For Cash Flow Analysis, select 0-Bank.
c) Bank Account Line of Credit
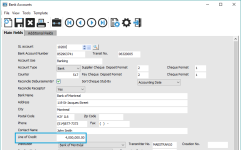
To provide accurate opening and closing balances – and available funds, the amount must be specified for each bank account.
maestro* > Accounting > Maintenance > Accounting > Bank Accounts
- Complete the Main Fields tab as needed.
Field
Description
Line of Credit
Amount agreed upon by the bank to lend funds to the customer.
Note: In the Cash Flow Analysis option, the line of credit appears in the upper left corner of the table. The first tab’s Line of Credit field displays the sum of all bank accounts covered by the grouping*.
* For more information on groupings, refer to the Cash Flow Analysis Help document.
2. Customizing the Analysis
The analysis is presented in a user-friendly table containing several tabs, each representing a bank account; the first tab is a summary of the included accounts. Three elements can be set up: the table’s lines (which represent transactions or budgeted amounts), the table’s columns (each identifying a period), and the manual adjustment types.
a) Line Configuration
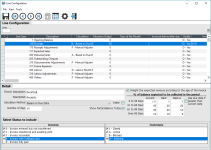
The analysis’s default includes 14 lines (such as Receipts, Disbursements, Labour, etc.); each one can be adapted to meet precise requirements. Parameters like rules and calculation methods as well as weighting provide the opportunity to choose how the information is processed. In some cases, for instance the Opening and Closing Balance lines, only the descriptions used in the analysis table and whether the lines will be visible in the table can be changed.
maestro* > Accounting > Financial Management > Cash Flow Analysis > Line Configuration
Detailed instructions regarding this option are provided in the Line Configuration Help document.
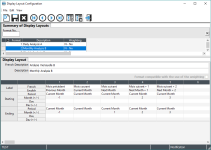
b) Display Layout Configuration
This option is similar to the financial statements’ format definition. The table’s columns, which allows users to determine how the data is presented; each stand for a particular period.
In this context, however, the term “period” does not necessarily refer to an accounting, financial, or fiscal period. It represents a user-defined time span that can mean a different duration (such as a day, week, or month) according to the type of analysis.
All columns are configured in reference to a specific moment designated as the “current period”. Periods are therefore “before” or “after” the current period.
maestro* > Accounting > Financial Management > Cash Flow Analysis > Display Layout Configuration
Detailed instructions regarding this option are provided in the Display Layout Configuration Help document.
c) Define Manual Adjustment Types
As its name indicates, this option is used to create types to group similar adjustments – such as asset sales.
maestro* > Accounting > Financial Management > Cash Flow Analysis > Define Manual Adjustment Types
Detailed instructions regarding this option are provided in the Define Manual Adjustment Types Help document.
3. Monitoring the Cash Flow Analysis
As mentioned in the introduction, once the first two segments have been completed ( maestro* and analysis configuration), users can move on to the actual analysis. Other than reviewing the information, manual adjustments can be made.
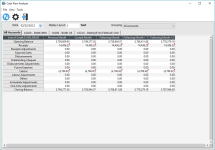
a) Cash Flow Analysis
This option enables users to display the cash flow status on a given date based on a selected format. The cash flow analysis is accessible from the dashboard (see Appendix).
maestro* > Accounting > Financial Management > Cash Flow Analysis > Cash Flow Analysis
While checking the cash flow, analysts can drill-down on every table cell to view the composition of an amount, except for the opening and closing balances. In addition to the transaction list, information such as the transaction details – all the way to the journal entry level – is available. A red square in a cell means that transactions have been posted for that line/period.
Previous months only contain posted transactions.
As the month progresses, actual sales and expenses are recorded and displayed as expected receipts and disbursements. To provide an accurate portrait of the situation, the “actuals” amounts are deducted from the Expected Sales and Future Expenses budgets. If the “actual” amount exceeds the budget, a zero (0) will be displayed in these cells. Specific information can also be obtained by drilling down on the amounts; in the Transaction Details window, maestro* shows the related Budget and Actual amounts, while considering the appropriate credit and debit. The resulting amount is Budget – Credit + Debit.
Detailed instructions regarding this option are provided in the Cash Flow Analysis Help document.
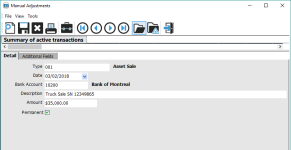
b) Manual Adjustments
Users go through this option to enter adjustments that only affect the cash flow analysis temporarily. For example, if you expect to receive an amount for the sale of a truck, you can post this amount as a manual adjustment to include it in the cash flow analysis.
maestro* > Accounting > Financial Management > Cash Flow Analysis > Manual Adjustments
If you check the Permanent box, the adjustment will be displayed in the analysis until the check mark in the field is cleared.
Detailed instructions regarding this option are provided in the Manual Adjustments Help document.
Appendix
Configuring the Cash Flow Analysis Applet in the maestro* Dashboard
Another way to access the Cash Flow Analysis is by using the applet provided in the dashboard.
To install the Cash Flow Analysis applet:
- Click the My Dashboard icon on the maestro* toolbar.
- Right-click on an existing tab and select the Add a dashboard option.
- Enter a name for the new dashboard, for instance, Cash Flow, then click OK.
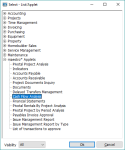
- From the Select – List/Applet window, navigate to the appropriate option which in this case is maestro* Applets and select Cash Flow Analysis.
- Click Ok.
The Cash Flow Analysis applet will be installed, with the same functionalities as the actual Cash Flow Analysis option.
